Epoxy
What is it?
Epoxy is a very versatile material that serves a lot of functions in boatbuilding and boat repair (including fiberglass boat repairs). Its use is not limited to boats though, and it can also find use in general woodworking, or even home repairs. If memory serves me right, technically, it is called a "thermoset plastic". It is composed of two parts that arrive in separate containers: The "resin" and the "hardener", both of which are syrupy liquids. Depending on the manufacturer of the epoxy system, you mix the two in certain proportions. When properly mixed and stirred, an exothermic reaction (one that gives out heat) starts, and the epoxy slowly starts to harden. It first passes through a gel stage (it is no more a liquid but can still be dented with your fingernail), and then becomes solid. This process is referred to as "curing" of the epoxy. Cured (or hardened) epoxy is basically an inert plastic with excellent strength and water resistance. From more than one source I have read that the strength of a proper epoxy bond is stronger than the plywood itself. You can keep on working with epoxy until it reaches the gel stage. The time that this takes depends on a variety of factors which will be explained later.
Unthickened and Thickened Epoxy
We shall call mixed resin and hardener without any additives as "unthickened epoxy". It can be used to seal various materials (wood and plywood in our case) against water. It can also be used to bond materials just like ordinary glue, but an equally strong bond can be obtained with more efficient use of epoxy by thickening it somewhat. For thickening the epoxy you use materials called "fillers". Every epoxy manufacturer has a line of fillers compatible with their products. Each filler has different characteristics as regards to bonding strength, color, ease of sanding, etc. Fillers are usually cheaper than the epoxy itself, so, although you can substitute your own fillers, I recommend that amateur builders buy the filler from the manufacturer. After mixing the resin and hardener and stirring thoroughly, you start adding the filler (and keep stirring) until you get the consistency you desire. A jargon has emerged with respect to epoxy consistency. I have listed these below, along with the amount of filler and purpose of each:
| Amount of filler | Consistency | Preferred for |
| None | Syrup | Coating, wetting out before bonding, applying fiberglass |
| Some | Ketchup-like | laminating layers, and bonding large panels. |
| More | Mayonnaise | general bonding, and filleting |
| Even more | Peanut butter | gap filling, filleting and fairing. |
Where and how is it used?
Coating
For sealing your wood (or plywood) against water, you need to coat it with unthickened epoxy. You can use a brush for this purpose. You'll have to throw the brush away in the end though, because no solvent can clean cured epoxy. So, use the cheapest brushes you can find. If you are sealing large surfaces such as the hull of a boat, for example, brush application is not recommended. Pour some amount of epoxy on the surface and spread it around either using a roller or with rotary motion using a semi-stiff plastic piece called a squegee. If you keep the angle between the surface and the squegee as small as possible, you'll minimize the amount of tiny air bubbles generated. Air bubbles are not desirable. The more the epoxy penetrates into the surface, the better the quality of sealing. It is therefore desirable to sand the surface first, both to increase penetration, and to get rid of any contaminants that may be present on the surface. Be sure to clean the surface after sanding. Multiple layers of sealing are recommended for boats.
Wetting out before bonding
Even though epoxy can be used as a glue to bond pieces in unthickened form, thickened epoxy is preferred for this task. However, the strength of the bond depends on how deeply epoxy penetrates into the pieces being bonded. If thickened epoxy is applied directly to bond the pieces together, the material may absorb some epoxy from the mixture and result in an "epoxy starved" bond. The strength of such a bond may be questionable, so it is a good idea to wet out the pieces with unthickened epoxy before bonding. Plywood, especially the ends of plywood absorb a lot, so don't neglect this step. After wetting out the parts, bond the pieces with thickened epoxy before the unthickened epoxy cures.
Applying Fiberglass
You use unthickened epoxy while applying fabric or fiberglass tape. While applying fabric (to the outside of a hull, for example) place the cloth, pour some epoxy over it, and spread it either with a roller or a squegee. Avoid trapping air bubbles between the fabric and plywood. If you notice a bubble, drive it out. Also avoid using too much epoxy and use just enough to make the fabric translucent. After it gels but before it completely cures, apply the next coat using the same method. Since fiberglass tape is usually placed over fillets, application is a bit different. First place the tape over the freshly run fillet. Then, using a roller (with a suitable diameter) or your finger, lightly press the tape over the fillet. We don't want air bubbles, but also don't want to dent the still soft fillet. Then, I recommend you to wait a few minutes. The tape will absorb some epoxy from the fillet and parts of it will become translucent. I apply unthickened epoxy to the remaining opaque sections using either a brush or roller. Finally, check again for trapped air bubbles and get rid of them if you find any.
Laminating
Laminating is a very elegant solution to many problems in boatbuilding. A thicker plywood may be required (as for the rudder and centerboard of the D4, for example) but you may not have that. Laminating may also be your easisest solution when you need to bend a thick piece (for a gunwale maybe). It may be impossible to bend the piece to the required curve, but you can still obtain the desired thickness using many layers bonded on one another. To laminate, clean, sand, and then wet out both contact surfaces first. Then apply thickened epoxy (ketchup or mayonnaise consistency) to one of the surfaces and clamp. You are done. There are a few things to be observed. If the pieces are small (or long but thin), you can use thicker epoxy (mayonnaise). If you are laminating large surfaces however, a thinner consistency (ketchup) will be better because it reduces the probability of trapping air bubbles between layers. Trapping air is a serious problem for large surfaces, so drill as many holes as necessary to the top piece to let air escape (I drill holes at every 10 cm in both dimensions). Then lightly clamp the pieces and see the epoxy ooze out of the holes. One final but very important point: The strength of the bond does not depend on the clamping pressure. Actually just the opposite is true. If you clamp strongly so as to drive all the epoxy out, you'll get a poor bond. Clamping in epoxy bonding is required only to prevent the pieces from moving while the epoxy cures. So, do not apply too much clamping pressure.
Bonding
The procedure is essentially the same as described for laminating. First clean and sand the pieces. Then wet out the contact surfaces. Then thicken the epoxy to the desired consistency. Mayonnaise, or even ketchup consistency is allright if gravity is on your side. If gravity is working against you epoxy may sag, in this case add more filler to bring it to peanut butter consistency. Apply thickened epoxy and clamp the pieces. Use only enough pressure to keep the pieces together.
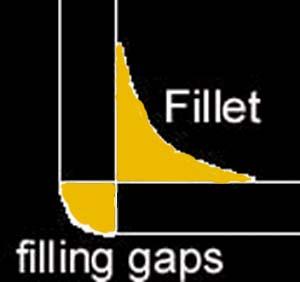
Filleting, gap filling and fairing
When you thicken epoxy to mayonnaise or peanut butter consistency, you obtain a putty. When you apply this putty to inside corner joints, then it is called a fillet (I think). Filleting makes joints stronger by distributing the load to a larger surface. When you bond two pieces and clamp them, some epoxy will inevitably ooze out of the joint. When tou trace your finger along the joint to so as to drive this epoxy back inside the joint, you obtain a U shaped curve there. This is the fillet. You can use your finger to shape the fillet (wear gloves) but people usually use wooden tongue depressors, spoons or whatever they can find. Another option is to make your own device from scrap material according to the fillet radius you desire.
|
For good results, the thickness of the fillet in its thickest part (along the 45° line from the joint) should be about the thickness of the plywood to be bonded. The length of the fillet (the distance from the joint to the end of the fillet along the plywood) must be more than plywood thickness. If the epoxy that has oozed out of the joint is not enough to obtain these dimensions, add more. |
Gap filling is what the name implies (see figure). Once again you start by wetting out the surfaces. Then apply thickened epoxy to the gap and shape it with whatever you can find. Fairing refers to filling dents and other low areas of a surface so as to obtain a smooth surface. Once again, you wet out the application areas before applying thickened epoxy. It is best to apply the thickened epoxy with a squegee. When the epoxy cures, sand thoroughly. Since you don't need an extremely strong bonding compound for fairing purposes, use a filler which is easily sandable (usually easily sandable fillers have less bonding strength and vice versa).
What you must be careful about
| 1 | To the best of my knowledge, epoxy is not carcinogenic. However, it causes allergy with prolonged contact. Therefore, always wear gloves and don't let it contact your skin. Never ever your eyes. Don't inhale epoxy vapors and sanding dust. More information on health issues is available on containers. Once cured, it is inert and totally harmless. |
| 2 | Epoxy is a messy substance and will inevitably find its way on to your clothes, tools, etc. when working on a boat. Try to clean your tools with paper towels before it cures. You'll understand what this means when you start using it. |
| 3 | Epoxy cures with an exothermic reaction. If you mix large quantities, it may become very hot in the container. This increases the curing rate, which, in turn, increases the amount of heat generated. People usually use disposable graduated cups for mixing and I have read reports of epoxy flashing in paper cups. Therefore, work with small batches. Spreading mixed epoxy thinly to a large area improves heat dissipation and slows down the curing rate. |
| 4 | Previously applied epoxy, before it cures, will chemically bond with newer layers and form the strongest kind of bond. Once it cures, newer layers will not chemically bond with it, therefore, you MUST sand it first. |
| 5 | Cured epoxy will usually be covered with a thin film of wax-like material called amine blush. It is harmless but may clog your sandpaper while sanding. Fortunately, it dissolves in water. Therefore wipe away the amine blush with wet paper towels before sanding cured epoxy. |
| 6 | Epoxy does not adhere to (or poorly adheres to) plastic. Use nylon sheets on your workbench and any place necessary. Otherwise you may end up with your rudder welded to your porch because of leaking epoxy! If you are not sure whether it will adhere to a particular material, test with scrap pieces first. |
| 7 | The worst property of epoxy is probably that it is sensitive to ultraviolet (UV) radiation. UV light is said to break down its molecular bonds thereby weakening it in time (I don't know how long this takes, but definitely not a few hours). If your epoxy work will be subject to sunlight, you must paint it (prefer light colors in warmer climates because excessive heat build-up also damages cured epoxy). Or, if you want a bright finish, look for a varnish that does not pass UV light. |
| 8 | Epoxy can be used not only with wood but with other materials such as metals, styrofoam or even rocks (I have glued glass with it). Remember though, the better the penetration into the material, the stronger the bond. Sand first. Some manufacturers sell special etching kits for metal applications (aluminum in particular). |
How do different systems compare and who sells it in Turkey?
There are many manufacturers and most products have similar characteristics, at least on paper. I have used System Three and West System products and can comment on these two only. My experience with both products is extremely satisfying. The major difference between the two is the mix ratios. System Three epoxy requires a 2:1 resin to hardener ratio whereas the main line of West System products require a resin to hardener ratio of 5:1 (by weight or volume). A ratio of 2:1 is preferable for mixing small batches (which you'll be doing most of the time). This ratio is also more forgiving, because if you deviate a little from the given ratio, the epoxy may take a very long time to cure, or may not cure at all. In fact, if your epoxy does not cure, the problem is almost always in the mix ratio unless, of course, you are working in arctic climates.West System has pumps that are installed on the containers and deliver the correct ratio at every stroke thereby eliminating the burden of measurement at every batch. I suggest you to buy them in case you decide on their products.
The resin forms the basis of the epoxy. Both manufacturers sell hardeners that make the epoxy cure at different speeds. Curing rate increases with ambient temperature. Therefore, if you are working in a warm environment, you should choose a slow hardener in order to have time to apply the epoxy properly before it gels. On the other hand, if the ambient temperature is low, epoxy resin mixed with a slow hardener may take days to cure. In this case a fast hardener is appropriate.
In addition to epoxy, both manufacturers offer application tools, protective clothing, measurement devices, brushes, rollers, compatible fiberglass tape and fabric, compatible paint and invaluable literature. Their prices are also comparable. Check their web sites.
In Turkey I was able to find only one dealer who sells epoxy products. A.R.C. Pazarlama ve Makina Tic.A.S of Istanbul is the official dealer of West System. Therefore, I had to use West System products in building the D4. I think they import from the UK, and because of this reason sell in metric containers and dimensions. Direct price comparisons are therefore difficult to make. In general, their prices are about 1.5 to 2 times more expensive than West System's domestic (US) prices (I have no idea on European prices). The persons I contacted with were very helpful and I had no problems with them. They were also very punctual because my shipments arrived the next day (twice). These qualities are not shared by many companies in Turkey. In addition to epoxy, I bought the fillers, fiberglass tape and fabric, and mini pumps from them. All materials were of high quality. You may find cheaper alternatives, especially to fillers and fiberglass. I would not take any risks though, because epoxy is the most expensive of the lot.
Because I built the boat during the summer, I used the West System slow hardener. This gave a pot life of about 15 minutes and a working time (in thin film) of about one hour on an average 30 degree day. Left overnight, everything was solid. Another thing to note is that the West System mini pumps function well when the containers are down to about half full but as more epoxy is used, they start blowing some air along with the resin and hardener. This was very troublesome as it disturbed the mix ratio. I had to pump both pumps once to get rid of the air, save the stuff in separate cups, and later pour back into their respective containers.
The "West System User Manual" and "The Epoxy Book" by System Three Resins were of great help in preparation of this article. The latter can be downloaded from the System Three web site.